翻译各种格式的文件
纯文本文件
txt纯文本文件没有额外的标签信息,所有片段都支持合并与拆分。
IDML文件
IDML是Adobe InDesign使用的基于XML的文件格式。最新版的InDesign生成的文件要想给老版本的InDesign打开,往往便要使用IDML格式。一般InDesign的文件都保存为indd。indd是专有格式,不能被第三方软件进行解析,所以要翻译InDesign文件需要先将其转换为IDML文件。
IDML其实是一个zip压缩文件,里面的文件结构如下:
.
├── META-INF
│   ├── container.xml
│   └── metadata.xml
├── MasterSpreads
│   └── MasterSpread_udd.xml
├── Resources
│   ├── Fonts.xml
│   ├── Graphic.xml
│   ├── Preferences.xml
│   └── Styles.xml
├── Spreads
│   ├── Spread_uc8.xml
│   ├── Spread_uce.xml
│   └── Spread_ucf.xml
├── Stories
│   ├── Story_u106.xml
│   ├── Story_u11d.xml
│   ├── Story_u134.xml
│   ├── Story_u151.xml
│   └── Story_ued.xml
├── XML
│   ├── BackingStory.xml
│   └── Tags.xml
├── designmap.xml
└── mimetype
我们要关注的主要是designmap.xml文件、Spreads文件夹、Stories文件夹和Resources文件夹的内容。
designmap.xml是整个文件的大纲,spread文件是每个页面的结构,story文件则是spread里文本框存储的文本。Fonts.xml保存了字体信息,Styles.xml保存了样式信息。
BasicCAT分别读取designmap.xml文件和Spreads文件,获得story文件在原文中的显示顺序,然后对其文本进行提取。
下面是一个Story文件的内容:
<?xml version="1.0" encoding="UTF-8" standalone="yes"?>
<idPkg:Story xmlns:idPkg="http://ns.adobe.com/AdobeInDesign/idml/1.0/packaging" DOMVersion="13.0">
    <Story Self="u19caf" AppliedTOCStyle="n" UserText="true" IsEndnoteStory="false" TrackChanges="false" StoryTitle="$ID/" AppliedNamedGrid="n">
        <StoryPreference OpticalMarginAlignment="false" OpticalMarginSize="12" FrameType="TextFrameType" StoryOrientation="Horizontal" StoryDirection="LeftToRightDirection" />
        <InCopyExportOption IncludeGraphicProxies="true" IncludeAllResources="false" />
        <ParagraphStyleRange AppliedParagraphStyle="ParagraphStyle/Intro Copy">
            <CharacterStyleRange AppliedCharacterStyle="CharacterStyle/$ID/[No character style]">
                <Content>“No capes!” That’s what Edna says in the first film when Mr. Incredible wants a cape on his new Supersuit. She knows that capes can be dangerous for Supers. A cape caused one Super to get pulled into a jet turbine, and another was sucked into a spinning </Content>
            </CharacterStyleRange>
            <CharacterStyleRange AppliedCharacterStyle="CharacterStyle/Intro Copy Bold">
                <Content>vortex</Content>
            </CharacterStyleRange>
            <CharacterStyleRange AppliedCharacterStyle="CharacterStyle/$ID/[No character style]">
                <Content>. Capes could cause other problems, too. Let’s see what they are.</Content>
            </CharacterStyleRange>
            <CharacterStyleRange AppliedCharacterStyle="CharacterStyle/$ID/[No character style]" FillColor="Color/Black" FontStyle="300" PointSize="12">
                <Properties>
                    <Leading type="unit">20</Leading>
                </Properties>
                <Br />
            </CharacterStyleRange>
        </ParagraphStyleRange>
        <ParagraphStyleRange AppliedParagraphStyle="ParagraphStyle/Body Copy">
            <CharacterStyleRange AppliedCharacterStyle="CharacterStyle/$ID/[No character style]" />
        </ParagraphStyleRange>
    </Story>
</idPkg:Story>
段落信息保存在ParagraphStyleRange这个标签里,一个ParagraphStyleRange标签可以包含很多CharacterStyleRange标签,里面是具体的文本。IDML文件中的样式分为全局样式和本地样式,全局样式存储在styles.xml文件中,story文件通过AppliedParagraphStyle和AppliedCharacterStyle保存对应的全局样式名,而本地样式被定义在属性和Properties元素里,比如PointSize、FontStyle等。
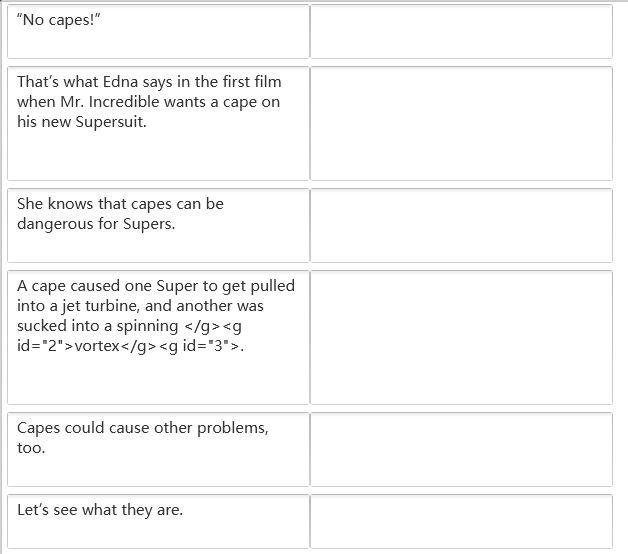
上面的story文件,BasicCAT将其转换为以下带标签的文本。
<p16><c0>“No capes!” That’s what Edna says in the first film when Mr. Incredible wants a cape on his new Supersuit. She knows that capes can be dangerous for Supers. A cape caused one Super to get pulled into a jet turbine, and another was sucked into a spinning </c0>
<c3>vortex</c3>
<c0>. Capes could cause other problems, too. Let’s see what they are.</c0>
<c0 id="3">
</c0>
</p16>
<p3><c0></c0>
</p3>
上例中 p16 , c0 中的数字对应的styles.xml文件中某个全局样式的顺序。而 <c0 id="3"> 中的id属性则是story中characterstylerange的顺序,用于生成目标文件时读取本地样式。c0对应的是默认的没有特殊格式的样式,所以BasicCAT在显示的原文中对其进行隐藏。另外段落标签和文本内容为非文本的标签也可以进行隐藏。
最终,上述内容在BasicCAT中是这样显示的:

其中c3标签对文字进行了加粗。英文字体一般有很多字重,比如特细、细、常规、粗等,而中文字体一般只有一种常规体。平时在Word里可以设置汉字的加粗是通过软件算法实现的,而IDML中是通过设置字重来实现的。所以,为了保证英译汉时,标签的效果在生成的译文中也有效,BasicCAT采用具有7种字重的思源宋体作为中文的显示字体,并将英文的字重转换为对应的思源宋体的字重。其对应关系如下:
- 100->ExtraLight
- 200->ExtraLight
- 300->Light
- 400->Regular
- 500->Medium
- 600->SemiBold
- 700->Bold
- 800->Heavy
- 900->Heavy
- Normal->Regular
- Black->Heavy
所以,为了在生成的idml文件中显示中文,需要安装思源宋体。
idml中的标签不是必须翻译的,如果不翻,BasicCAT会自动补充c0标签,保证译文不被忽略。
XLIFF文件
XLIFF是处理提取出来的待翻译文本的一种XML格式。CAT软件利用这一格式存储从docx、html、idml等格式文件提取出来的文本,翻译完成后再利用这一格式文件生成目标文件。
XLIFF是OASIS组织制定的标准,可以作为一种中间格式,在不同的翻译软件之间使用。
XLIFF利用继承自opentag的抽象占位符标签和继承自tmx的封装标签来表示特殊样式。
比如对于This is bold,在xliff中有两种表示方法。
占位符标签:
<trans-unit id="1">
<source>This is <g id="1">bold</g>.</source>
</trans-unit>
封装标签:
<trans-unit id="1">
<source>This is <bpt id="1">\b</bpt>bold<ept id="1">\b0</ept>.</source>
</trans-unit>
抽象占位符标签的好处是针对不同格式,抽象出来的内容可以一样。比如html、rtf中表示加粗,html是 <b> ,而rtf中是 \b ,抽象之后都变成了g标签,而且显示的内容更少。但是抽象之后,原文标签中的含义也被隐去了。
在BasicCAT中翻译xliff中带格式的内容时,会显示各种标签内容。标签内容如果不翻,生成的译文中会自动在结尾处补上缺失的标签,但有可能导致译文内容缺损。
注意
标签内容如果不翻,生成的译文中会自动在结尾处补上缺失的标签,但有可能导致译文内容缺损。
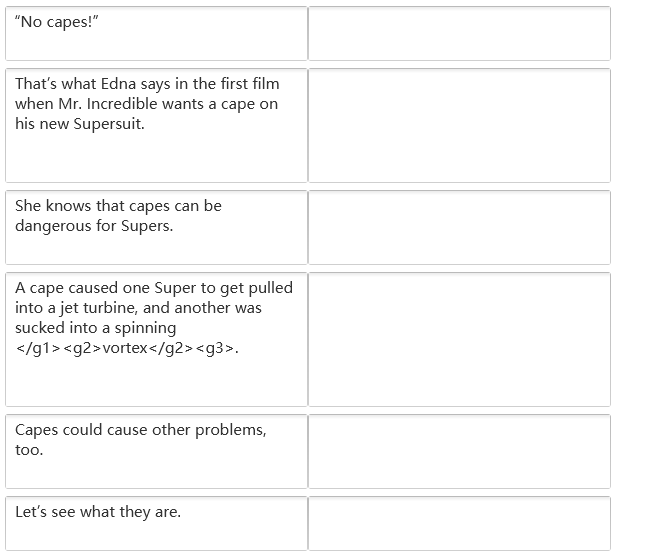
以下是教程idml部分的范例文件用okapi提取出来的xliff文件的内容:
<?xml version="1.0" encoding="UTF-8"?>
<xliff version='1.2'
    xmlns='urn:oasis:names:tc:xliff:document:1.2'>
<file original="Stories/Story_u19caf.xml" source-language="en-US" target-language="zh-CN" datatype="xml">
<body>
<trans-unit id="NB085C0FA-tu1" xml:space="preserve">
    <source xml:lang="en-US"><g id="1">“No capes!” That’s what Edna says in the first film when Mr. Incredible wants a cape on his new Supersuit. She knows that capes can be dangerous for Supers. A cape caused one Super to get pulled into a jet turbine, and another was sucked into a spinning </g><g id="2">vortex</g><g id="3">. Capes could cause other problems, too. Let’s see what they are.</g></source>
    <target xml:lang="zh-CN"><g id="1">“No capes!” That’s what Edna says in the first film when Mr. Incredible wants a cape on his new Supersuit. She knows that capes can be dangerous for Supers. A cape caused one Super to get pulled into a jet turbine, and another was sucked into a spinning </g><g id="2">vortex</g><g id="3">. Capes could cause other problems, too. Let’s see what they are.</g></target>
</trans-unit>
</body>
</file>
</xliff>
上述内容在BasicCAT中是这样显示的,对片段中开头结尾处的成对标签或单个标签进行了隐藏:
PO文件
PO是和xliff类似的一种格式,最初是GNU用来本地化C语言程序的。
以下是教程idml部分的范例文件用okapi提取出来的po文件的内容:
msgctxt "okpCtx:sd=197:tu=NB085C0FA-tu1"
msgid "<g1>“No capes!” That’s what Edna says in the first film when Mr. Incredible wants a cape on his new Supersuit. She knows that capes can be dangerous for Supers. A cape caused one Super to get pulled into a jet turbine, and another was sucked into a spinning </g1><g2>vortex</g2><g3>. Capes could cause other problems, too. Let’s see what they are.</g3>"
msgstr ""
msgctxt后面是上下文信息,msgid存储原文内容,msgstr存储译文内容。okapi生成的PO也使用了标签来表示特殊样式。
上述内容在BasicCAT中是这样显示的,和xliff一样,对片段中的开头结尾处的成对标签或单个标签进行了隐藏:
PDF文件
PDF文件是较难处理的格式,可以用Word、ABBYY、Solid Document Converter等工具将其转换为Word,但原来的格式往往不能得到很好的保留。用Adobe Acrobat可以修改文字,但有诸多限制。
PDF文件往往是由另一种格式的文件生成的,比如docx、idml等,如果能找到源文件是最好的。如果要求保留格式却又没有源文件,只能翻译后试着重新排版。
在出版社翻译InDesign文件,一般交给译员一个PDF文档,译员将译文排版成一个Word,然后交给排版人员在InDesign中进行替换。这时,我们需要做的就是提取PDF的文字进行翻译。
BasicCAT自带了PDF转文字的工具,可以通过菜单栏Tools->PDF2TXT打开。如果PDF的文字可以提取,那可以直接提取出来。如果不行,便使用开源的OCR软件tesseract进行识别。
工具支持添加页码信息,还可以针对InDesign生成的对页进行处理。
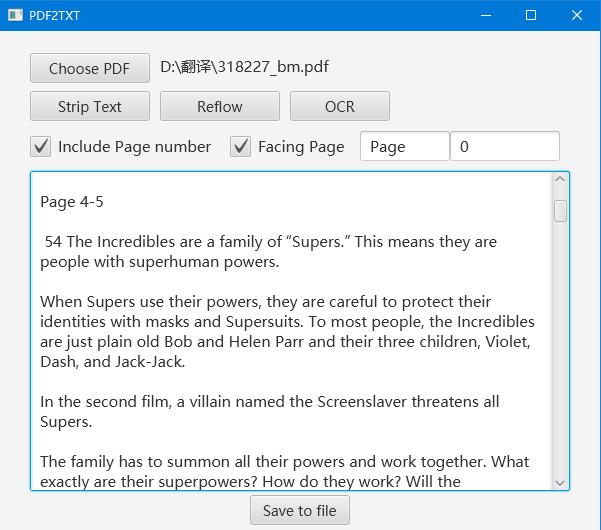
PDF中的文字是没有段落信息的,所以默认提取出来的每行文字后面都有回车,PDF2TXT提供一个reflow功能,可以自动去除多余的回车。
关于tesseract的安装,Windows可以 在此 下载一份程序,运行PDF2TXT时会提示设置tesseract的路径,选择即可。
Linux和macOS(homebrew)用户可以直接安装tesseract-ocr这个包,并下载对应语言的模型文件。
利用Okapi翻译其它格式文件
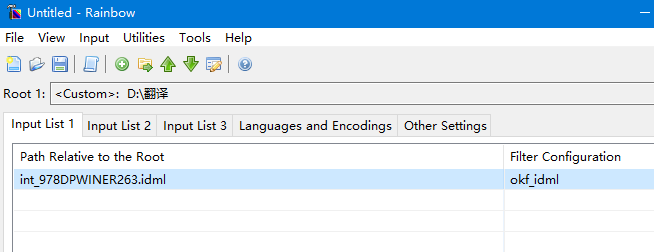
Okapi 是一套开源跨平台的翻译组件。有用于检查译文质量的checkmate、修改句段分割规则的Ratel,还有用于执行各种翻译与本地化任务的Rainbow。
要翻译其它格式文件,我们主要需要使用Rainbow。
- 从源文件生成xliff或者po文件
打开Rainbow,把要翻译的源文件拖拽进去。
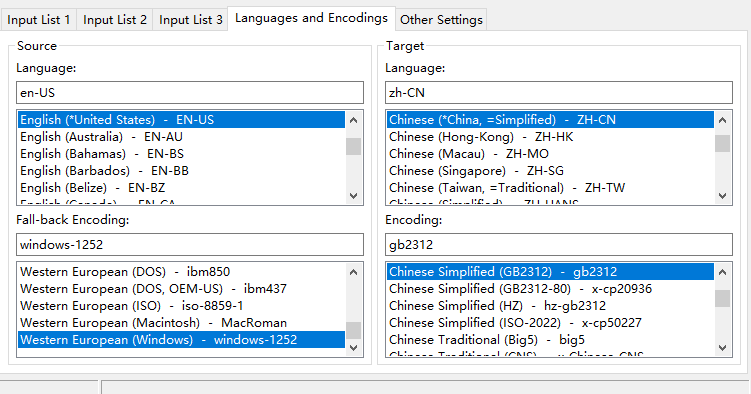
进行原文和译文、文件编码等设置。
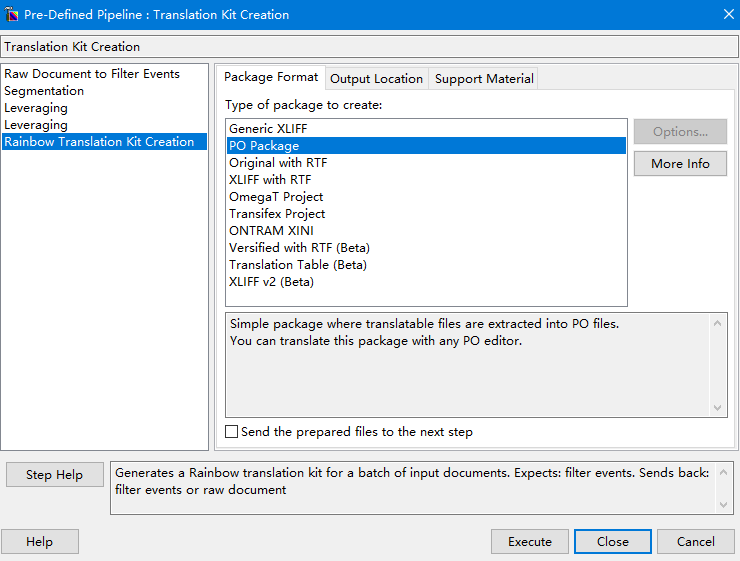
点击菜单Utilities->Translation Kit Creation,选择要生成xliff、po还是其它中间格式,选择生成的目标位置(默认为源文件所在目录)。
点击执行后,在目标位置会生成一个pack1文件夹,里面的work文件夹存放了生成的xliff等格式文件。
- 从生成的项目导出目标文件
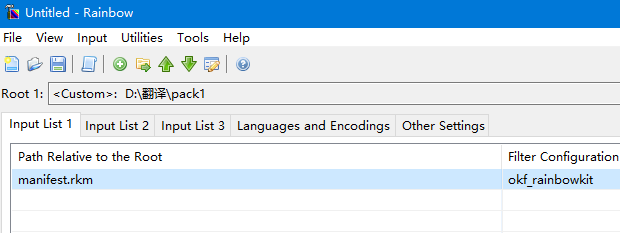
翻译完成后,把xliff等格式文件放回work文件夹。然后添加manifest.rkm到Rainbow中。
点击菜单Utilities->Translation Kit Post-processing,可以生成目标文件。
在此 查看Okapi支持的文件格式。
BasicCAT从1.5版开始集成了Okapi Tikal,可以自动将其它格式文件转换为XLIFF文件,并自动根据翻译好的XLIFF文件生成目标文件。不过,如果你需要修改Okapi处理某种格式时使用的参数,仍然需要使用Rainbow。